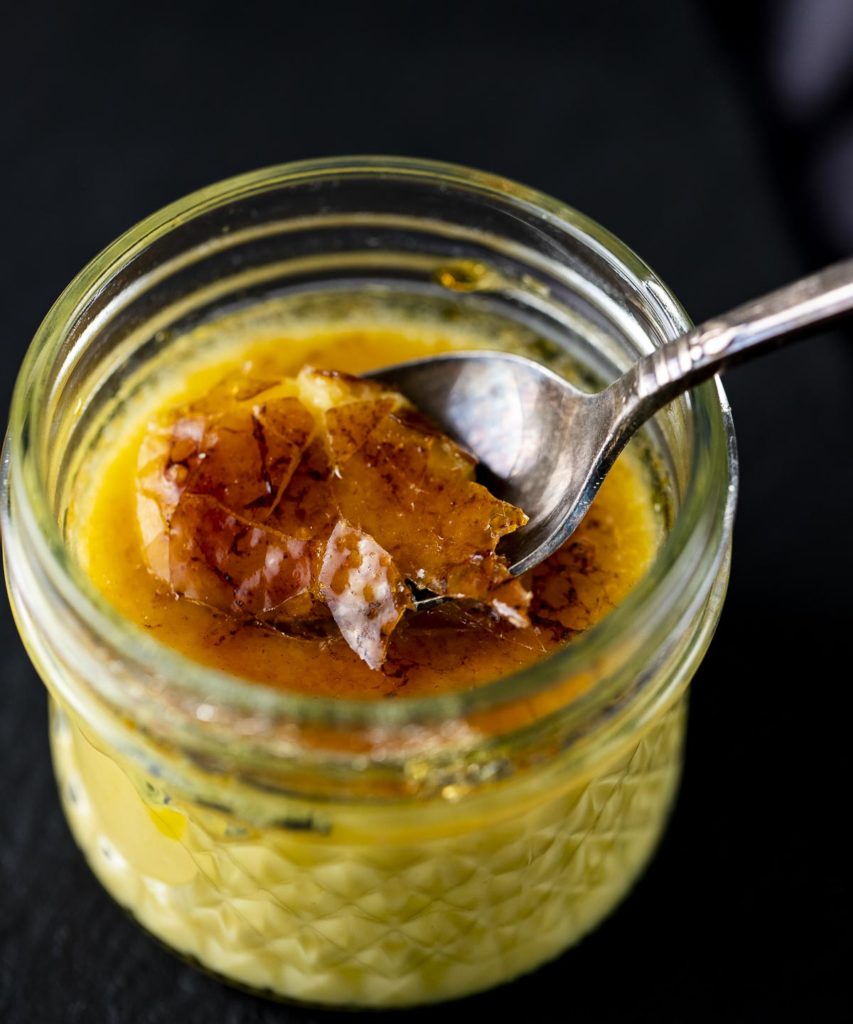
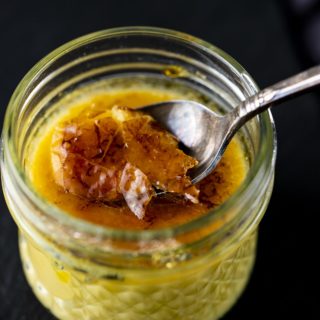
This Sous Vide Crème Brulee comes out ultra creamy and decadently delicious. With an intense vanilla flavor and hard bruleed top, the creamy custard is something you'll want to keep going back for again and again.
If you're a fan of creamy, comforting desserts, you should also try my Easy Vegan Rice Pudding. While this sous vide crème brûlée delivers a rich, silky custard with a crackly caramelized topping, the vegan rice pudding offers a cozy, dairy-free alternative that's equally satisfying. Made with simple ingredients and plenty of chocolatey flavor, it's a great dessert to keep in your recipe rotation when you're looking for something a little different.
This recipe is so easy to make, and you'll end up with the most perfect crème brulee every time using this sous vide technique. Now, I am in love with this classic crème brulee that we make the traditional way, but I think this sous vide version even has that beat!
There is no need to temper eggs or worry about getting a scrambled egg custard for this creme brulee dessert. Sous vide custard comes out perfect every time - SERIOUSLY!
Why This Easy Sous Vide Creme Brulee Recipe Works
If I had a choice (I do) I will ALWAYS make classic creme brulee using the sous vide method from now on. It's so easy and hassle free.
- You get perfect, creamy custard every time - no curdling!
- You can make as many or as few as you'd like - just double, triple, quadruple the recipe to make dessert for a crowd!
- Serving it right in the jars makes it super easy, and also super cute of you're serving to guests.
- Sous Vide crème brulee lasts longer than traditional versions, so you can keep it in the fridge for up to 2 weeks before serving!
And guys, if you're into custard recipes, another super easy, super delicious dessert is this sous vide flan - it's easily become one of our favs! And for complete decadence, this sous vide pots de creme are perfection.
Check out these 10+ amazing sous vide desserts!
Jump to:
- Why This Easy Sous Vide Creme Brulee Recipe Works
- More Delicious Sous Vide Desserts
- What is Sous Vide Cooking?
- Ingredients for crème brûlée
- Equipment Used for This Recipe
- How to Make Sous Vide Crème Brûlée
- How to Caramelize Creme Brulee Without a Torch
- Variations
- Sous Vide Creme Brûlée Toppings
- Make Creme Brulee Without Mason Jars
- Expert Tips
- Recipe
- 💬 Comments
Want to Save This Recipe?
Enter your email & I'll send it to your inbox. Plus, get great new recipes from me every week!
By submitting this form, you consent to receive emails from Went Here 8 This.
More Delicious Sous Vide Desserts
What is Sous Vide Cooking?
Sous vide is basically a method of cooking using what is called an immersion circulator (i.e. the sous vide machine). This immersion circulator circulates water in a temperature controlled water bath at a certain temperature to perfectly cook your food every time.
Because the temperature doesn't change, and it keeps your meat (or dessert, veggies, etc.) at the same temperature, your risk of overcooking becomes very minimal.
To learn even more about sous vide cooking, head over and read "what is sous vide cooking and the benefits of sous vide cooking."
We are also in love with some of these other sous vide recipes:
- Sous Vide Scallops with Lemon Butter Sauce
- Sous Vide Filet Mignon with Creamy Horseradish Sauce
- Ginger Soy Sous Vide Trip Tip
- Sous Vide Flank Steak with Creamy Peppercorn Sauce
Ingredients for crème brûlée
The full list of ingredients and amounts can be found in the recipe card at the bottom of the post.
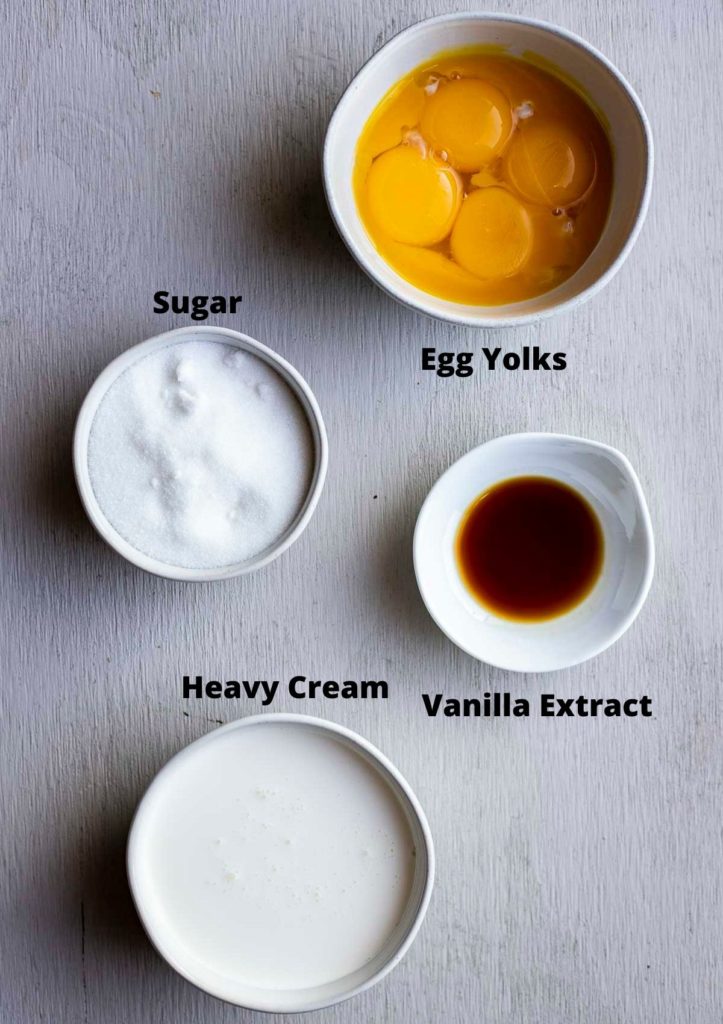
I highly recommend using a high quality vanilla extract for this dessert recipe as the vanilla flavor should be prominent. Here are some options:
- Nielsen-Massey: This one is a pretty big splurge, but if you bake a lot it's worth it.
- Simply Organic Pure Vanilla Extract
- Spice Island Pure Vanilla Extract
You can also use fresh vanilla bean - just scrape the seeds/pulp from one bean into the cream. (also try vanilla bean paste)
Heavy cream gives the custard base an ultra creamy quality.
Simple granulated sugar is used in both the custard as well as the creme caramel topping (bruleed sugar).
Equipment Used for This Recipe
This recipe does require that you have a few things.
Sous Vide Machine (Sous Vide Circulator): I use the Anova Culinary Sous Vide Precision Cooker for all my sous vide cooking. There is a more beginners model and a pro version, but I find this one is the perfect in between option.
Plastic Container for Sous Vide Water Bath: You can technically use any large container that the sous vide cooker will attach to. However, I use this Everie 12 quart sous vide container as it is super convenient and I can leave the water in for 1-2 weeks at a time to prevent waste.
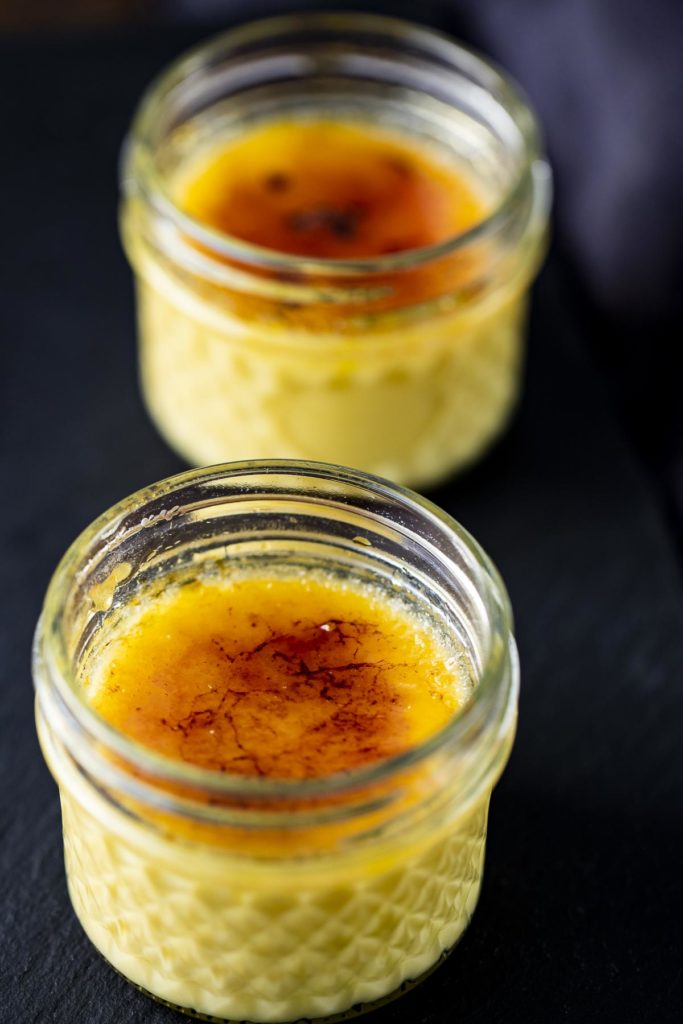
4 Ounce Canning Jars: I use these wide mouth ball canning jars and they work just perfect for this recipe. Plus glass jars are cute for serving.
Blow Torch: While you can use the broiler, broilers tend to be much more inconsistent (easier to burn your crème brulee!!). Plus using a kitchen torch is so much more fun. I use this kitchen torch and love it.
How to Prevent Jars From Cracking in the Sous Vide
Jars can crack if they experience thermal shock or too much pressure.
To prevent thermal shock, we place the jars in the water bath before heating the water. This allows the jars to come slowly to temperature, which should keep them from cracking.
Jars can also crack if there is too much pressure. If they are tightened too tightly, they will crack.
To prevent cracking under pressure, we tighten the jars "fingertip tight." What this means is that we tighten the lids until we barely feel it grab the jar. It should be easy to twist the lid back off with your fingertips, hence the term.
It may feel like it's not closed all the way, but as long as you felt that slight grab, it'll be fine.
How to Make Sous Vide Crème Brûlée
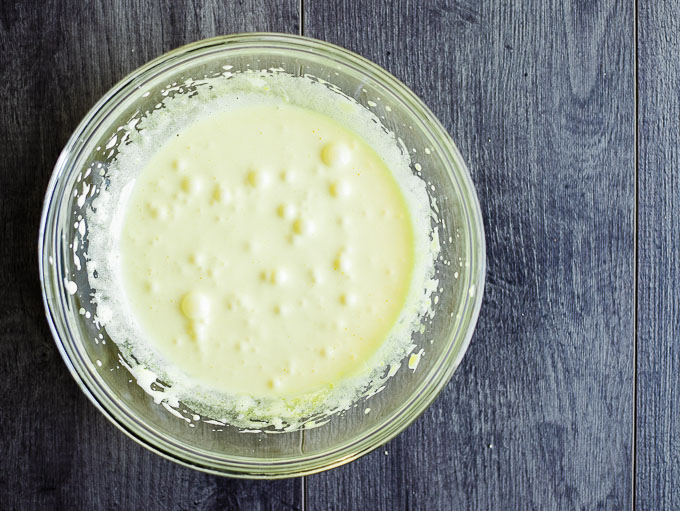
Whisk the egg yolks and sugar in a bowl until a paste forms.
Mix the vanilla into the cream and whisk the cream into the egg and sugar mixture.
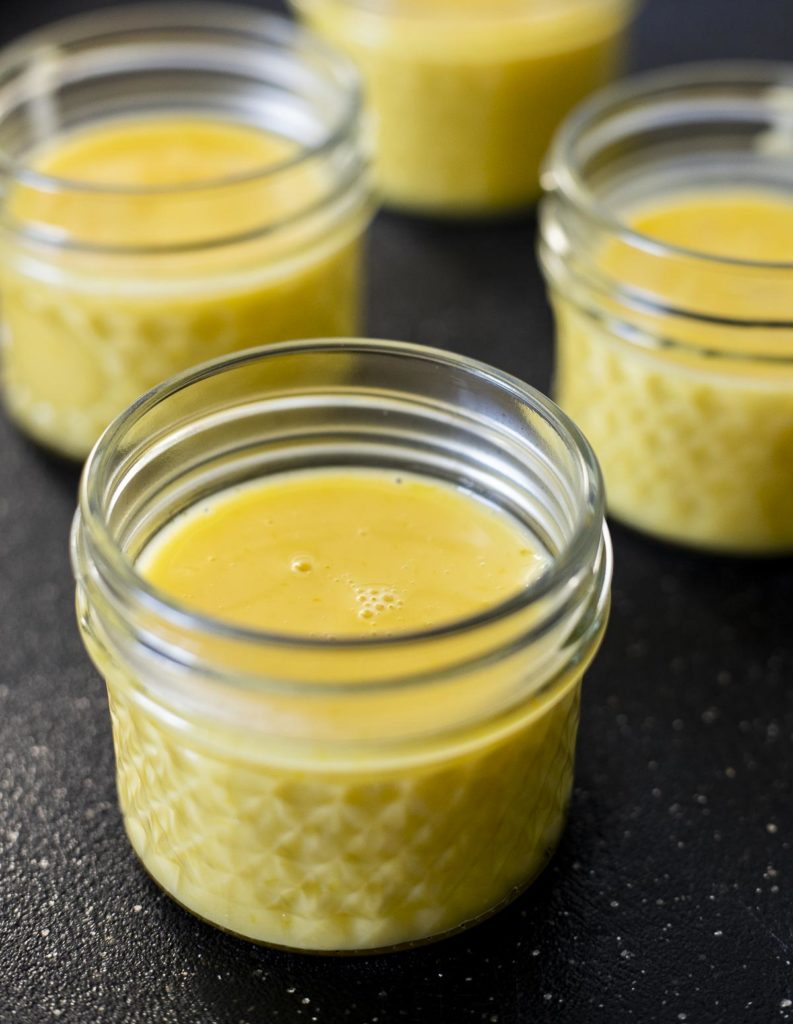
Pour the mixture into four 4 ounce jars with lids. Tighten the lid "fingertip tight." "Fingertip tight" means tightening the lid until it barely grabs - where you can open it with your fingers. **This helps prevent the jars from cracking under pressure.
Jars should be ¾ full. Don't fill any higher.
Place the jars in the water bath (they should be completely submerged) and heat to 179F degrees. Start the jars cold otherwise the sudden difference in temperature can cause them to crack.
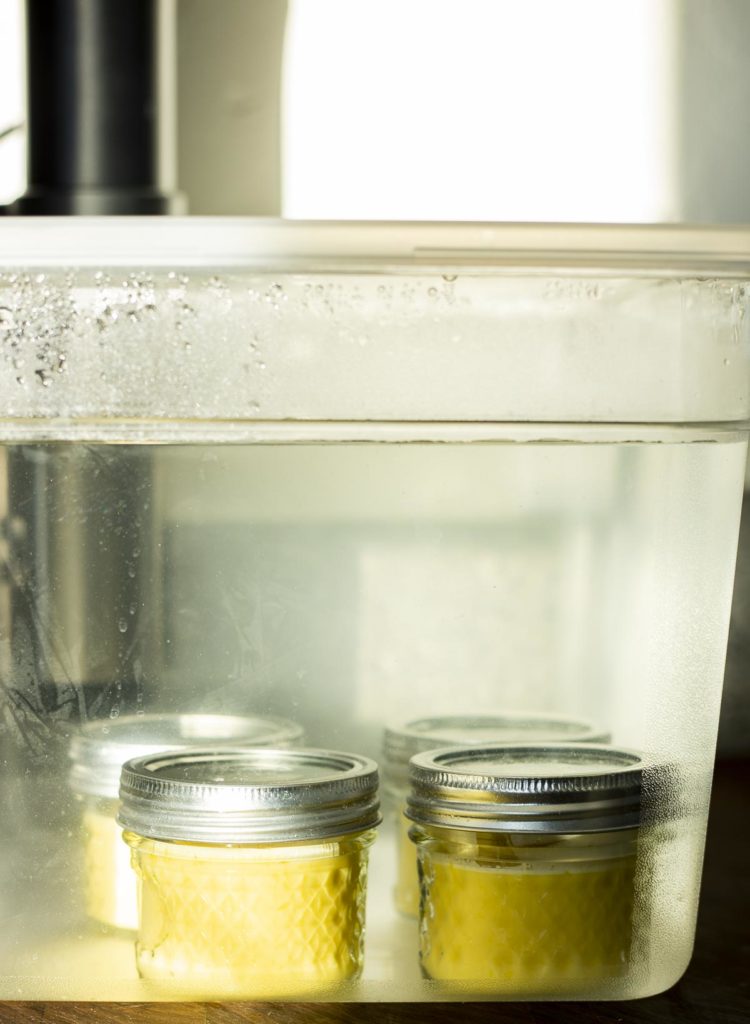
Cook for one hour once they come to temperature. Remove the jars from the water bath and let them cool enough to handle, then remove the lids.
Let them cool until they reach room temperature. Wipe any excess moisture off the lids and place them back on.
Refrigerate the crème brulee until fully cooled, about 3 hours or overnight. They are perfect to make ahead because they can stay here for up to 2 weeks!
Remove from fridge and remove the jar lids off when ready to use.
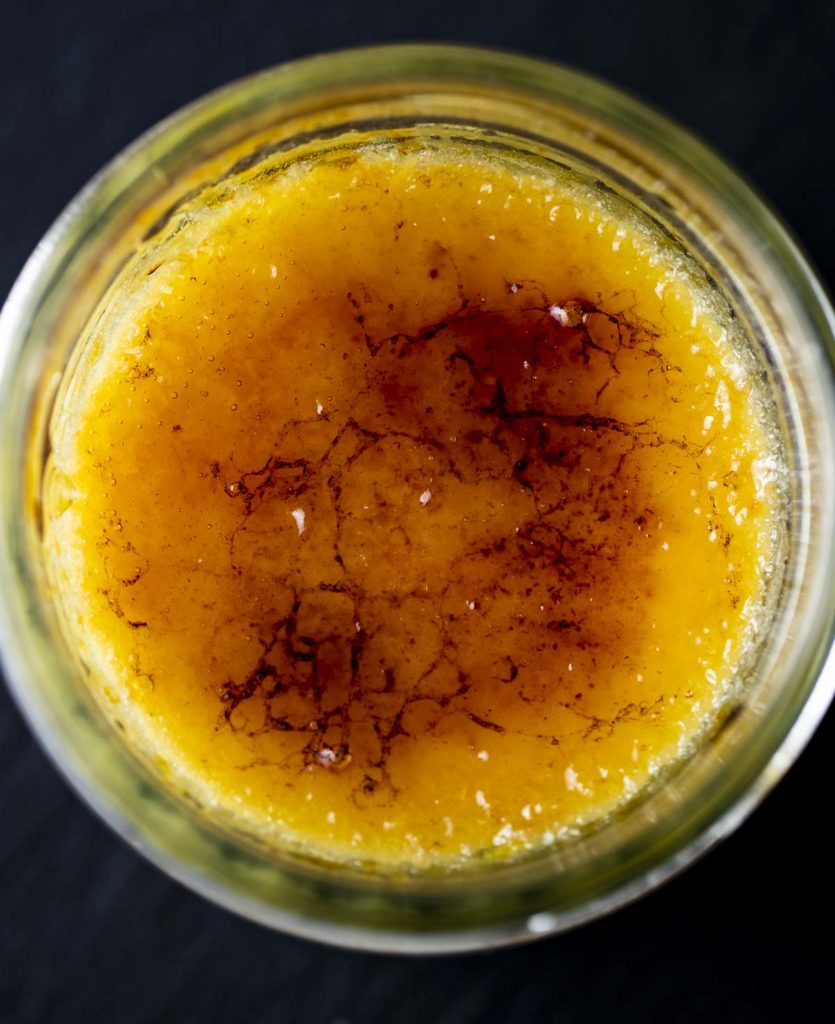
Sprinkle sugar over the top of the crème brulee and swirl it around until the top is fully coated. Pour off any excess. Repeat for each one once you're ready to serve.
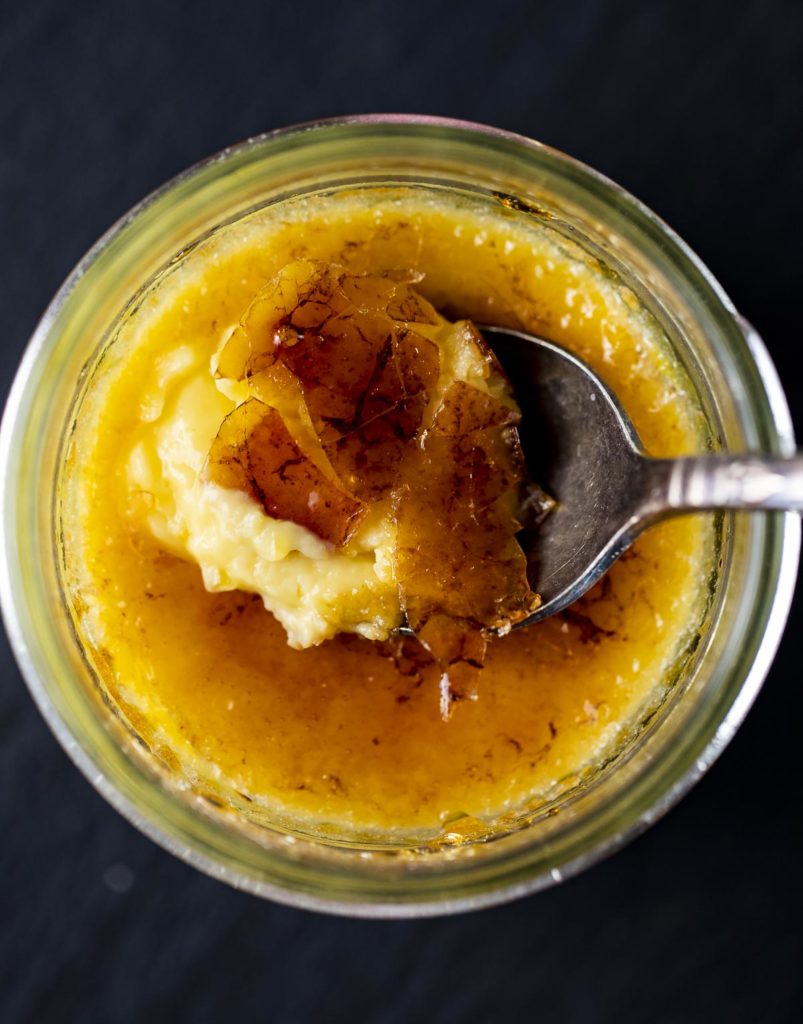
Using a kitchen torch, caramelize the sugar on top (it should be a light brown color and it will start to harden). Let it cool, then serve.
How to Caramelize Creme Brulee Without a Torch
If you don't have a kitchen torch, you can also use the broiler. Place the broiler rack right underneath the heat and heat broiler.
Place the mason jars (or ramekins if you use the bag method below) directly under the broiler.
Cook until the tops have caramelized, watching carefully to ensure they don't burn.
Variations
While I love the simplicity and richness of the vanilla flavor, you can replace the vanilla (or add to it) with any of these fun ideas:
- Add 1 teaspoon of lemon zest (also use orange or lime zest) to the cream. Warm it and let it sit for 10 minutes before whisking it into your egg yolks.
- You can also use fresh vanilla bean instead of the vanilla extract- just scrape the seeds/pulp from one bean into the cream.
- Add 2 tablespoons of bourbon to the cream for a more boozy crème brulee.
- Use raw sugar for caramelizing instead of white sugar for a deeper, more caramelized flavor.
- Add 1 tablespoon of dried culinary lavender to warmed cream and let it steep for 20 minutes. Strain the lavender out before using.
- Add a cinnamon stick and/or a couple cardamom pods to the warm cream and let it steep for 20 minutes. Strain the cinnamon stock and cardamom pods before using.
- Steep a green tea bag with the warm cream for 10 minutes. Remove before using.
- Replace the vanilla extract with almond extract, or any kind of extract you prefer.
Sous Vide Creme Brûlée Toppings
This classic crème brûlée is wonderful on it's own, but would also be great with any of these topping ideas:
- Fresh berries
- Add some grated white chocolate (or dark chocolate) on top after you caramelized.
- Top with toasted coconut
- a touch of whipped cream
Make Creme Brulee Without Mason Jars
If you don't have mason jars, you can also make this recipe in a freezer bag using the water displacement method (below).
Follow the same instructions as above, except pour the mixture into the freezer bag instead of the mason jars.
Slowly put the bag in the sous vide bath, and clip the top to the side.
Remove the bag when done and pour into individual ramekins.
Chill fully then follow the same instructions for the caramelized sugar on top.
What is the Water Displacement Method?
The displacement method is where you slowly submerge a ziplock bag in water pushing the air out of the top of the bag (the bag should be slightly open at the top to allow air to escape).
Use a clip (I use sous vide magnets) to clip the bag to the side to keep it from floating and getting air and/or water inside.
Expert Tips
- Try to pop all the larger bubbles on the surface on the crème brulee before putting the lid on. (if there are any)
- You can also strain the custard mixture before cooking to ensure an extra smooth texture and eliminate any bubbles.
- Always add the jars to the water bath before heating to help prevent breaking.
- For thicker custard, cook the creme brulee at 183°F instead of 179°F.
- The custard needs to be fully chilled (at least 3 hours, but best overnight) before caramelizing the sugar and serving to get the perfect results.
- Add a pinch of salt to the custard to bring out the flavor.
If you love this recipe, please leave a star rating and a comment below and let us know your favorite thing about it. We'd also love to connect on Instagram! Follow us at @went_here_8_this for awesome recipes and all sorts of fun food stuff 🙂
Recipe
Sous Vide Creme Brulee (Vanilla)
Ingredients
- 5 egg yolks room temperature
- 2 cups heavy whipping cream
- ½ cup granulated sugar
- 1 teaspoon pure vanilla extract
- 2 tablespoons granulated sugar for brulee topping
Instructions
- Whisk the egg yolks and sugar in a bowl until a paste forms.
- Mix the vanilla into the cream and whisk the cream into the egg and sugar mixture.
- Pour the mixture into four 4 ounce jars with lids. Tighten the lid "fingertip tight." The jars should be ¾ of the way full. Don't fill them any higher.
- "Fingertip tight" means tightening the lid until it barely grabs - where you can open it with your fingers.
- Place the jars in the water bath and heat to 179F degrees.
- Cook for one hour. Remove from the water bath and let them cool enough to handle, then remove the lids.
- Let them cool until they reach room temperature. Wipe any excess moisture off the lids and place them back on.
- Refrigerate the crème brulee until fully cooled, about 3 hours or overnight.
- Remove from fridge and take the lids off when ready to use.
- Sprinkle sugar over the top of the creme brulee and swirl it around until the top is fully coated. Pour off any excess. Repeat for each one once you're ready to serve.
- Using a kitchen torch, brulee the tops until the sugar has caramelized (it should be a light brown color and it will start to harden). Let it cool, then serve.
Expert Tips:
- Try to pop all the larger bubbles on the surface on the crème brulee before putting the lid on. (if there are any)
- You can also strain the custard mixture before cooking to ensure an extra smooth texture and eliminate any bubbles.
- Always add the jars to the water bath before heating to help prevent breaking.
- For thicker custard, cook the creme brulee at 183°F instead of 179°F.
- The custard needs to be fully chilled (at least 3 hours, but best overnight) before caramelizing the sugar and serving.
Leona Marchand says
How can I make this recipe with pumpkin purée and pie spices?
Danielle says
I haven't tested it with pumpkin yet, but if I were to try, I would replace 1/2 cup of the cream with pumpkin puree and add 1 teaspoon of pumpkin pie spice. Definitely something I will be testing as we get closer to the holidays 🙂 Let me know how it turns out!
Jeremy says
I've made this recipe multiple times. It turned out like soupy pudding the first time and I was sure I'd done something wrong, so I decided to try again. Same result the 2nd time and although it says it makes enough for 4 desserts it makes more like 7. Would love to know if I'm doing something wrong but think this recipe might be a fail.
Danielle says
Hi jeremy, I'm so sorry it didn't come out. I'm going to remake it and see what the issue is with it since I've had a couple comments. I'll retest it this weekend and post any updates next week!
Tung says
This was so easy and delicious. Unfortunately one of my jars broke when I was as torching the top. I’m assuming it was thermal shock since it may have still been cold from fridge. Has this ever happened to you? More generally, do you need to let the jars get closer to room temperature before torching?
Danielle says
Oh no! Yes, it can happen because of thermal shock. I haven't had one break yet, but I let my jars get to room temp before putting them in the water bath.
Esther says
I made this recipe using a freezer bag and magnets in the sous vide...one of the corners popped in the water bath but i don't think water got in the mixture. it stayed in the sous vide for a while since i put the bag before the water was hot and then the timer for an hour started. it was slightly clumpy when i poured it in the ramequins, is that the texture it supposed to have? i had made sure to strain the mixture before it went in the bag. i let it all set overnight but it's still not set for some reason. any idea what i did wrong? i would love to achieve the right result. i added 2 tbsps of amaretto instead of bourbon and swapped the vanilla for almond extract. very tasty flavor but just a custard not a set creme brulée. thanks for your input!
Danielle says
Hi Esther - I'm sorry it didn't turn out right for you! It shouldn't really be clumpy when you take it out of the bag. It will be a little less thick as it doesn't firm up quite as well when cooking it in a bag instead of the jars. I would try increasing the temperature to 183F and letting it cook for 1 1/2 hours. OR, try adding in another egg yolk or two as they help to thicken. Unfortunately, I have occasionally run across eggs that just don't set right (maybe they are old or whatever the case may be). It doesn't happen often, but could also be your culprit. I hope this helps somewhat!
Sheri says
Hi Danielle!
I’m planning on using the zip top bag method for my creme brulee since I don't have the proper sized jars right now. Since it will be cooked in a full batch then transferred to individual ramekins, can I cook it with a vanilla bean rather than the vanilla extract?
Danielle says
Yes, you can definitely cook it with vanilla bean. Let me know how it turns out!
Sheri says
Turned out great! Thanks for the recipe!
Danielle says
That's great to hear. You're welcome!
Michelle says
Love this recipe and making it for a formal dinner with 12 friends. What advice do you have on how many jars can be cooked in the soups vide at one time?
Danielle says
Honestly, it's however many you can fit while keeping everything submerged under at least 1" of water. You can probably do up to 20 depending on the size of your sous vide container. The most important thing is to make sure they stay submerged. I hope you enjoy!
Michelle says
Would it be okay to use a rack and make a second layer of jars?
Danielle says
Yes, definitely! As long as you can get them to fit and they stay submerged, add as many as you'd like 🙂
Michael says
I have made this many times (including right now!), Thank You! It is fabulous. I add a drop (just 1 or 2) of Almond extract to get a little nutty flavour. Note: Joule recommends a temp of 181 which is what I use for 1 hour. A couple of degrees shouldn't make much difference.
Danielle says
Love the idea of using almond extract! Such a great flavor. Glad you liked it!
Pam says
I don't have a sous vide yet, but I've been considering one. This recipe makes me want to take the leap!
Danielle says
You should totally get one - they are awesome!
Beth Sachs says
Creme Brulee is my favourite dessert. Silky smooth and oh so creamy! great recipe.
Danielle says
Thanks Beth!
Luke Ratford says
This creme brulee recipe is amazing, we all loved it in our home, and love the blog which gives you so much info and step by step guide
You learn something every day and I didn't know Sous Vide was a cooking method as an immersion circulator 🙂
Thanks for sharing!!
Danielle says
I'm so glad you enjoyed it! Thanks so much 🙂
Dannii says
I always order creme brulee, but have never made it myself. I am definitely going to be giving this a try.
Danielle says
Hope you love it!